

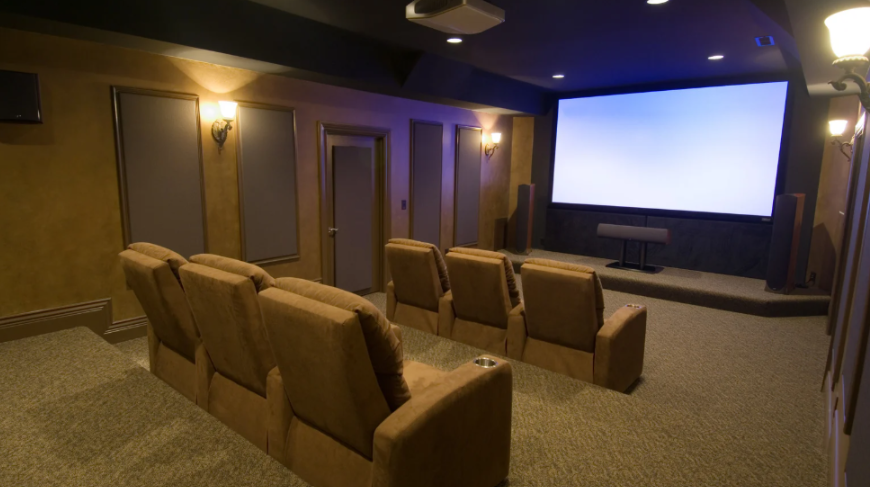
The best way to create a home theater in a luxury custom home is to plan it before framing begins. Choose a quiet, windowless room, size it around the screen and seating you actually want, build sound isolation into the walls and ceiling, run power, data and speaker wiring while walls are open, and design lighting and ventilation for a dark, sealed space.
Homeowners planning luxury home construction in Winnetka and similar high-end markets often discover that these early structural decisions matter far more than which projector or receiver they buy later. This guide walks through each decision in the order a builder, designer and AV integrator would normally tackle it, with sizing tables, a pre-drywall checklist and the mistakes that are most expensive to fix.
Why a New Build Is the Best Time to Plan a Theater
Retrofitting a theater into a finished room is possible, but it usually means compromises: speakers that sit where studs allow rather than where they sound best, visible conduit, limited isolation and a ceiling height you cannot change. In a custom build, the theater can be treated as its own engineered space. You can specify ceiling height for a tiered riser, add a dedicated electrical circuit, plan a separate HVAC zone and choose wall assemblies designed to keep sound in and noise out.
Looking at current luxury home construction trends shows entertainment spaces moving away from a single oversized TV in the family room toward dedicated, multi-use media rooms that double as gaming lounges, sports rooms and quiet listening spaces. Deciding early how the room will be used shapes nearly every choice that follows.
Assemble the Right Team Early
A dedicated theater sits at the intersection of architecture, construction and electronics, so it works best when the right people talk to each other from the start. Most luxury projects involve:
- The architect or designer: sets room location, dimensions, ceiling height and how the theater connects to the rest of the house.
- The builder: carries out framing, isolation assemblies, HVAC and inspections, and coordinates trades on site.
- An AV integrator: designs the speaker layout, display, equipment rack, control system and calibration.
- An acoustician (for high-end rooms): models isolation targets and treatment, especially where the theater borders bedrooms.
Ask the integrator for a written design package (speaker positions, screen dimensions, rack location, conduit routes and electrical loads) that the builder can price and build from. That single document prevents most of the on-site guesswork that leads to compromises.
Step 1: Choose the Right Location
Location drives both performance and day-to-day convenience. The ideal theater room has few or no windows, sits away from bedrooms and the kitchen, and has enough ceiling height for raised seating. Common options include:
- Lower level or basement: naturally dark, surrounded by earth on some sides and easier to isolate acoustically. Moisture control and egress rules need attention.
- Bonus room over the garage: separated from living areas, but floors need extra isolation so bass does not travel down into the rest of the house.
- Interior main-floor room: convenient for guests and aging in place, though it usually needs the most soundproofing because it borders busy spaces.
If the room must have windows, plan for blackout shades in pockets recessed into the ceiling, and consider acoustic glazing. Our guide to soundproof replacement windows explains how laminated and dual-pane glass reduce sound transfer.
Step 2: Size the Room Around the Screen and Seats
Work backward from how many people you want to seat and how immersive you want the picture to feel. Industry guidance from organizations such as SMPTE and THX is expressed as a viewing angle: roughly 30 degrees of horizontal field of view is a common minimum, and around 36 to 40 degrees feels more cinematic. In practice, many integrators place the main row at somewhere between about 1.2 and 1.6 times the screen width from the screen, then adjust for resolution and personal taste.
The table below gives rough starting points. Every room is different, so treat these as planning ranges to discuss with your builder and AV designer, not fixed rules.
| Seating goal | Typical layout | Rough room size to plan for | Ceiling height to consider |
|---|---|---|---|
| 4 to 6 seats | One row of recliners or a sectional | About 12 x 16 ft and up | 8 to 9 ft |
| 7 to 10 seats | Two rows with a riser | About 15 x 20 ft and up | 9 to 10 ft |
| 10 or more seats | Two or three rows, bar seating at the back | About 18 x 24 ft and up | 10 ft or more |
For each additional row, a riser of roughly 12 to 18 inches helps rear viewers see over heads in front. Allow a clear aisle wide enough for recliners to open fully and for people to walk past, and check local code for stair and riser requirements.
Step 3: Build Sound Isolation Into the Structure
Sound isolation (keeping sound in or out) and acoustic treatment (making the room itself sound good) are two different jobs. Isolation has to be designed into the framing and drywall, so it is the part most worth planning during construction. Common techniques include:
- Decoupled walls: staggered or double stud walls, or resilient clips and hat channel, so drywall is not rigidly attached to framing.
- Added mass: two layers of drywall with a damping compound between them.
- Cavity insulation: mineral wool or fiberglass in wall and ceiling cavities to reduce resonance.
- Sealed openings: solid-core or acoustic doors with seals, acoustic sealant at edges, and putty pads behind outlets.
- Quiet ductwork: lined or flexible duct runs with bends so HVAC noise and sound leakage are reduced.
Discuss target performance with your builder early. Even a modest upgrade in wall assembly usually costs less during framing than any fix after drywall is finished.
Step 4: Plan the Audio System and Acoustics
Most luxury theaters today use an immersive surround format such as Dolby Atmos or DTS:X, which adds height speakers to a traditional surround layout. Layouts are described with three numbers: ear-level speakers, subwoofers and height speakers. A 5.1.2 system is a solid entry point for a smaller room, while 7.2.4 or larger suits a dedicated theater with two rows.
Speaker placement tips
- Place left, center and right speakers behind an acoustically transparent screen, or directly around it, so dialogue appears to come from the picture.
- Plan in-ceiling or on-ceiling height speakers before drywall and mark joist locations so they can be positioned correctly.
- Use two or more subwoofers where possible. Multiple subs placed thoughtfully tend to give smoother bass across all seats.
- Avoid putting the main listening position exactly in the middle of the room or tight against the back wall, where bass problems are often worst.
Acoustic treatment
Once the room is isolated, treatment controls echo and reflections. A typical approach combines absorption panels at first-reflection points on side walls, diffusion on the rear wall, bass traps in corners, and carpet with a quality pad. Fabric-wrapped wall systems can hide all of this behind a finished, luxurious surface. After installation, a calibrated room correction system and a professional tuning session help the speakers work together.
Step 5: Choose a Screen and Display
There are three main paths, each with different room requirements:
| Display type | Strengths | Things to plan for |
|---|---|---|
| Projector and screen | Largest image for the money, true cinema feel, allows speakers behind an acoustically transparent screen | Needs good light control, a projector location with ventilation, and correct throw distance |
| Direct-view LED wall | Very bright, excellent contrast, works with some ambient light | Usually the highest cost, needs structural support, power and cooling |
| Large flat-panel TV | Simple, bright, lower cost | Size limits immersion in larger rooms; speakers cannot sit behind it |
If you choose projection, decide on screen size and aspect ratio (16:9 or a wider 2.35:1 or 2.40:1 format) before finalizing the front wall, since it affects speaker positions, soffits and any stage in front of the screen.
Step 6: Get Power, Wiring and Ventilation Right
Infrastructure is invisible once the room is finished, which is why it is so often underplanned. Ask your builder and electrician about:
- A dedicated circuit (or more than one) for amplifiers and the equipment rack.
- Conduit from the equipment location to the screen, projector and each seating row so future cables can be pulled without opening walls.
- Hard-wired network connections to the rack and streaming devices.
- Power at each seat for motorized recliners and USB charging.
- Ventilation for the equipment closet and a comfortable, quiet HVAC zone for a sealed room full of people.
Our article on building a more reliable electrical system covers surge protection and circuit planning that apply directly to a theater. A separate thermostat zone for the theater is also worth requesting.
Step 7: Design Lighting and Controls
Good theater lighting is layered and controllable. Recessed ceiling lights on dimmers handle cleaning and setup, wall sconces add ambience, and low LED step and aisle lights keep people safe once the film starts. Keep light off the screen surface and choose darker, matte finishes near the front of the room to reduce reflections.
A control system ties it together. One-touch scenes such as “Movie,” “Intermission” and “Cleanup” can dim lights, lower shades, switch inputs and set volume at once. Keep the interface simple enough that guests and family members can use it without instructions.
Step 8: Seating, Finishes and Comfort
Seating is where comfort and sightlines meet. Motorized recliners need space behind and in front, so measure fully reclined dimensions before finalizing rows. Sectionals or loungers suit families and casual viewing, while a counter-height bar row at the back adds seats and a spot for snacks.
For finishes, darker wall and ceiling colors reduce reflected light, and fabric panels, wood accents and upholstered seating all help acoustics. Built-in cabinetry can hide equipment, store media and provide a small refreshment area with a beverage fridge. These are the details that make the room feel like part of the home rather than a technical space.
Step 9: Calibrate, Test and Hand Over
A theater is not finished when the last seat is bolted down. Before you move in, the integrator should calibrate the display for the room’s light levels, run room correction for the audio system, set subwoofer levels and timing across all seats, and test every control scene. Ask for a walkthrough covering daily operation, what to do if a source does not appear, and how firmware updates are handled.
Request as-built documentation too: a wiring diagram, equipment list with serial numbers, network settings and warranty details. Keep it with the home’s other construction records so any future technician can work on the system without opening walls.
Pre-Drywall Home Theater Checklist
- Room dimensions, ceiling height and riser heights confirmed against the seating plan.
- Screen size, aspect ratio and front-wall layout (stage, soffits, speaker cavities) finalized.
- Isolation assemblies installed and inspected: decoupled framing, insulation, sealed penetrations.
- Speaker wire and backing in place for every planned speaker location, including ceiling heights.
- Conduit run from the rack to the screen, projector and each seating row, with pull strings.
- Dedicated circuits, seat power and network drops installed and labeled.
- Separate HVAC zone with quiet supply and return paths; rack ventilation planned.
- Lighting circuits, dimmer locations and step-light boxes positioned.
- Photos taken of every wall and ceiling before drywall for future reference.
Budget and Timeline Considerations
Costs for a dedicated luxury theater vary enormously depending on room size, construction method, display choice and finish level. A room with a large TV, a modest surround system and basic treatment sits at the lower end, while a fully isolated room with projection or an LED wall, a large immersive audio system and custom millwork can reach well into six figures. The most useful approach is to set a total budget early and ask your builder and integrator to split it across construction, equipment and finishes.
On timing, bring an AV integrator into the design phase, confirm the theater plan before framing, complete pre-wire before insulation and drywall, and install equipment near the end once dust-generating work is complete. Your builder can also confirm what inspections and approvals apply; our guide on how home builders support homeowners with permitting and local compliance explains how that process usually works.
Common Mistakes to Avoid
- Choosing equipment first and then trying to fit the room around it.
- Skipping isolation and relying only on wall panels to stop noise.
- Forgetting ventilation for the equipment rack and projector.
- Using glossy, light finishes that reflect light onto the screen.
- Not running spare conduit, which makes future upgrades costly.
- Placing the main seating row against the back wall, where bass buildup is usually worst.
- Leaving calibration until after move-in, or skipping it entirely.
Frequently Asked Questions
How big should a home theater room be?
A single row of four to six seats can work in a room of around 12 by 16 feet, while two rows with a riser generally need something closer to 15 by 20 feet or more. Screen size, seating type and ceiling height all affect the final dimensions.
Is a basement a good place for a home theater?
Often, yes. Basements are naturally dark and easier to isolate from the rest of the house. You will need to manage moisture, plan ventilation and meet local code for ceiling height and egress.
Projector or TV for a luxury home theater?
A projector and screen gives the biggest image and a true cinema feel in a dark room. A large TV or direct-view LED wall is brighter and handles ambient light better. The right choice depends on room size, light control and budget.
When should I plan the theater in a custom home build?
During design, before framing. Room size, ceiling height, wall construction, electrical circuits, conduit and HVAC all need to be settled before walls are closed.
What speaker layout should I choose?
A 5.1.2 immersive layout suits smaller rooms, while a dedicated theater with two rows often uses 7.2.4 or larger. An AV integrator can recommend a layout based on room shape and seating.
What is the difference between soundproofing and acoustic treatment?
Soundproofing, or isolation, stops sound passing between the theater and the rest of the house and must be built into walls, ceilings and doors. Acoustic treatment, such as panels and bass traps, controls echo inside the room so dialogue and music sound clear.
Final Thoughts on Planning a Home Theater
Treat the home theater as an engineered room, not a furniture decision. Lock in location, dimensions, isolation, wiring and ventilation during design, bring your AV integrator in before framing, and leave equipment choices for last. Get those foundations right and the room will sound and look outstanding for years, with easy upgrades when technology changes.
